The Peanut Butter Pie That Fixed My Faith in No-Bake Desserts
The Peanut Butter Pie That Fixed My Faith in No-Bake Desserts
There's something deeply suspicious about no-bake desserts, isn't there? Like, theoretically I understand the appeal—minimal effort, no oven drama, perfect for summer when the thought of heating up your kitchen makes you want to relocate to Antarctica. But there's always been this nagging voice in my head (probably inherited from my grandmother who believed anything worth eating required at least 45 minutes in the oven) that whispered: "But is it actually... good?"
And then I made this peanut butter pie. And honestly? It shut that voice up real quick.
The Psychology of Comfort in a Slice
Let me tell you something about peanut butter pie—it's not just dessert, it's therapy you can eat with a fork. There's something about that specific combination of creamy, salty-sweet filling against the chocolate crunch that just hits different. Maybe it's because peanut butter is inherently nostalgic for most of us (I mean, unless you're allergic, in which case I'm sorry and also there are variations coming up that'll work for you).
But here's what I think is really happening: peanut butter pie represents this perfect intersection of childhood comfort and adult sophistication. It's fancy enough to serve to guests, but familiar enough that your inner 8-year-old does a little happy dance when you see it coming.
The no-bake aspect? That's pure genius masquerading as laziness. Because sometimes you want that comfort without the production, you know? Sometimes you want to create something beautiful without turning your kitchen into a disaster zone.
Why This Recipe Changed Everything
I've tried probably fifteen different peanut butter pie recipes over the years, and most of them fell into one of two camps: either disgustingly sweet artificial nightmares that tasted like they were made entirely of corn syrup and regret, or overly complicated affairs that required so many steps you might as well have just made an actual cake.
This one, though—this one gets it right. And the secret isn't really a secret at all: it's about respecting your ingredients and understanding what each one brings to the party.
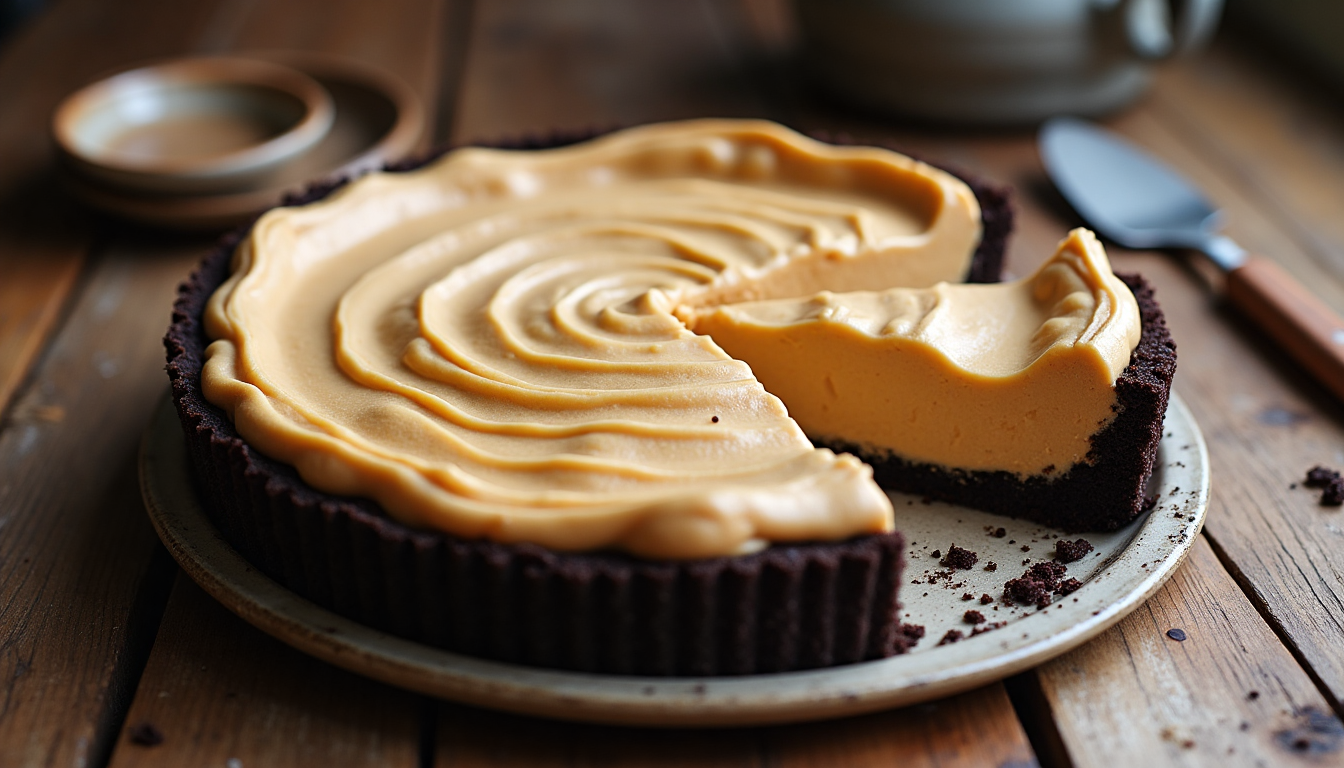
The Oreo crust isn't just there to hold stuff; it's providing that essential textural contrast and a hint of chocolate bitterness that keeps everything from being too cloying. The fresh whipped cream (not Cool Whip, never Cool Whip) gives you that airy, mousse-like texture that makes each bite feel indulgent rather than heavy. And the cream cheese? That's your stabilizer and your tang, keeping everything from being one-dimensionally sweet.
The Deep Dive: Technique Matters (Even When You're Not Baking)
Let's talk about why this works, because understanding the why makes you a better cook, even when you're not technically cooking anything.
The Crust Situation
Twenty-four Oreo cookies might seem like a lot, but trust the process. You want enough crust to actually taste it, not just have it be this sad, thin afterthought. When you're crushing them up—and please, use a food processor if you have one because trying to do this with a rolling pin and a bag is just an exercise in frustration—you want fine crumbs, not chunks.
The butter ratio is crucial here. Too little and your crust falls apart like a house of cards in an earthquake. Too much and it gets greasy and weird. Five tablespoons is the sweet spot, but here's a pro tip: add it gradually and pulse between additions so you can actually see how the mixture is coming together.
And that pinch of salt? Don't skip it. It's not about making things salty; it's about making all the other flavors more themselves, if that makes sense.
The Filling Philosophy
Here's where people usually mess up: they either overwhip the cream and turn it into butter, or they undermix everything and end up with a lumpy, streaky mess that looks like it's having an identity crisis.
The cream needs to be whipped to stiff peaks—that means when you lift the whisk, the peaks stand up and don't flop over like they're tired. But here's the thing: you're going to incorporate this into other ingredients, so it's going to deflate a little anyway. Don't panic about that.
For the peanut butter situation—and this is important—make sure you're using natural peanut butter that's been stirred within an inch of its life. You know that oil separation that happens? That oil needs to be completely incorporated, or you'll end up with weird oily pockets in your filling. Not cute.
The cream cheese needs to be soft. Like, actually soft, not just "I took it out of the fridge twenty minutes ago and called it good" soft. Room temperature for at least an hour, or thirty seconds in the microwave if you're impatient like me. Cold cream cheese will give you lumps, and no amount of beating will completely smooth those out.
The Folding Dance
This is where the magic happens, and where most people get nervous. You've got this beautiful, fluffy whipped cream, and you're about to fold it into this dense peanut butter mixture, and it feels like you're definitely going to ruin something.
But here's the secret: confidence. Use a big spoon or spatula, add about a third of the whipped cream first to lighten the peanut butter mixture, then fold in the rest in two additions. Cut down through the center, scrape across the bottom, and fold up and over. Rotate the bowl a quarter turn and repeat. It should feel gentle, like you're tucking the cream in for a nap, not beating it into submission.
You'll still see some white streaks when you're done, and that's okay. It's actually better than okay—it's perfect. Those streaks will smooth out as the pie chills, and overmixing will just deflate all that lovely airiness you worked so hard to create.
When Things Go Wrong (And How to Fix Them)
Because let's be real, sometimes they do. I've made this pie probably fifty times at this point, and I've definitely had my share of "learning experiences."
If your crust is too crumbly: You probably didn't use enough butter, or your cookies weren't crushed fine enough. You can fix this by melting another tablespoon of butter and working it in gradually until the mixture holds together when you squeeze it.
If your filling is too loose: This usually means your cream wasn't whipped enough, or your cream cheese was too warm. Stick the whole thing in the freezer for thirty minutes, then try whipping it a bit more. If that doesn't work, embrace it—you've just made a very fancy pudding.
If your filling is too stiff: Opposite problem—probably overwhipped cream or too-cold cream cheese. You can try folding in a couple tablespoons of additional heavy cream to loosen things up.
If everything tastes too sweet: This is why we put salt in things. Add a tiny pinch more salt to the filling, and maybe sprinkle some flaky sea salt on top when serving. Salt is your friend; it makes sweet things taste more complex and interesting.
Variations That Actually Work
The beautiful thing about this recipe is that it's basically a template. Once you understand the ratios and the technique, you can riff on it endlessly.
The Banana Situation: Slice a banana into rounds and layer them on the bottom of the crust before adding the filling. Elvis would approve. Just make sure to serve this the same day you make it, because bananas and time are not friends.
Chocolate Ganache Dreams: Melt together half a cup of heavy cream and four ounces of good chocolate (I like something in the 60-70% range), let it cool slightly, then spread it over the top of the pie before chilling. It's ridiculously indulgent and absolutely worth every calorie.
The Pretzel Twist: Replace the Oreo crust with a pretzel crust—just crush up about three cups of pretzels with a quarter cup of sugar and follow the same butter process. The sweet-salty thing is incredible.
Allergy-Friendly Options: Swap the peanut butter for almond butter or sunflower seed butter. The technique stays the same, but you might want to add a tiny bit more salt since peanut butter tends to be saltier than the alternatives.
The Ritual of Sharing
Here's something I've noticed about peanut butter pie—it makes people happy in a way that's almost disproportionate to what it actually is. Maybe it's the nostalgia factor, or maybe it's just that combination of flavors and textures, but I've never served this to anyone who didn't immediately ask for the recipe.
And that's part of what I love about no-bake desserts when they're done right. They're approachable. They're not intimidating. Your friends can actually make this, and they will, and then they'll probably text you pictures of their results, and suddenly you're part of this little chain of pie-making joy.
There's something beautiful about that, isn't there? About creating something that spreads itself around, that becomes part of other people's memories and traditions.
The Technical Stuff (Because Details Matter)
A few more things that'll make the difference between good pie and great pie:
Temperature control: Your cream should be cold when you whip it. Like, straight-from-the-fridge cold. Warm cream won't whip properly, and you'll end up frustrated and cream-less.
Timing: Don't try to rush the chilling time. Four hours is the minimum, but overnight is better. The flavors meld, the texture sets properly, and you get clean slices instead of... well, a delicious mess.
Serving: Use a hot knife for clean cuts. Just run your knife under hot water, dry it off, and slice. Wipe the knife between cuts for picture-perfect slices.
Storage: This keeps in the fridge for about four days, though good luck making it last that long. Don't freeze it unless you enjoy the texture of frozen despair.
Why We Need More Desserts Like This
In a world where everything seems to require seventeen specialty ingredients and a degree in engineering, there's something revolutionary about a dessert that asks for seven things you probably have in your kitchen and rewards you with something genuinely spectacular.
This isn't about being lazy or taking shortcuts. It's about understanding that sometimes the best techniques are the simplest ones, and that the most satisfying cooking experiences don't always require turning your kitchen into a war zone.
It's also about trust—trusting that simple can be sophisticated, that easy doesn't mean inferior, and that the best comfort foods are often the ones that don't require you to stress yourself out making them.
The Final Slice
So here's what I want you to do: make this pie. Not someday when you have time, not when you find the perfect occasion, but soon. Like, this week soon.
Because here's what's going to happen: you're going to realize that no-bake doesn't have to mean no-good. You're going to discover that twenty minutes of actual work can yield something that tastes like you spent all day in the kitchen. And you're probably going to find yourself with a new go-to recipe for those moments when you need to bring something somewhere, or when you just want to create a little bit of joy for yourself or the people you care about.
And maybe—just maybe—you'll start looking at those no-bake recipes with a little less suspicion and a little more curiosity. Because sometimes the best things really are the simplest ones, disguised as something else entirely.
What's the worst that could happen? You end up with a pie that's merely very good instead of absolutely spectacular? I mean, there are definitely worse problems to have.
So grab your Oreos and your peanut butter, and let's make something beautiful together. Your future self (and anyone lucky enough to get a slice) will thank you.